5.22.2013

Fruit Pizza Sugar Cookies with Orange Cream Cycle Coolwhip "Sauce"

{it's a working title}

My funny husband does not enjoy cake. Or pie. Or any kind of deliciousness that most people enjoy. I know what you're thinking, and don't worry... I argue with him about it all the time. Who doesn't like cake or pie? Or BROWNIES?? But, I digress. He had a birthday. And I had an itch to bake since I don't often get many opportunities to do so. I found a bunch of recipes that I kind of mixed all together. Mostly just from browsing good ol' Pinterest.
I think the part I liked most, other than for maybe the third time in my entire life having a batch of cookies come out perfectly the first time, is the "pizza sauce". It's orange cream cycle. Thanks to Menchies Frozen Yogurt, I have rediscovered my love for orange and vanilla aka cream cycle. My thoughts were, "hmm, I somehow want orange and vanilla in here...". The trick to the "sauce" is vanilla pudding mix! Whodda thunk?

Also, I must apologize now... Some of us are still trying to figure out our fancy camera. And by some of us, I mean me. Also doesn't help when you have two lights out in your kitchen.

Ingredients for the cookies:
1/2 cup butter, softened
1/2 cup shortening
2 cups sugar
1 teaspoon baking soda
1 teaspoon cream of tartar
1/8 teaspoon salt
3 egg yolks
1/2 teaspoon vanilla (I added a full teaspoon... rebel!)
1 3/4 cups flour

Directions for cookies:
Preheat oven to 300F. In a large mixing bowl beat butter and shortening with electric mixer on medium to high speed for 30 seconds. Add sugar, baking soda, cream of tartar, and salt. Beat mixture until combined, scraping sides of bowl occasionally. Beat in egg yolks and vanilla. Beat in as much flour as possible, stirring in any remaining flour. Shape dough into 1 inch balls (mine were much bigger). Places balls 2 inches apart on ungreased cookie sheet.
Bake 12-14 minutes or until edges are set, do not let edges brown! Cool on wire rack after about 5 minutes of resting on the cookie sheet.


Pick your fruit you want, and have it all cut up and ready to go. I used strawberries, raspberries, blueberries, mandarin oranges and kiwis. But you can use whatever you'd like.

Ingredients for the Cream cycle "Sauce"
1/2 brick of cream cheese, softened
1 1/2 cup Cool Whip, softened
2 tablespoons instant vanilla pudding mix
Splash of orange juice (or orange extract if you really want an orangey flavor)

Directions for "Sauce"
Beat the cream cheese until smooth. With a wooden spoon, mix in Cool Whip until combined, then add the vanilla pudding mix. At this point it will thicken up thanks to the pudding mix. Add in OJ and mix. If it's still super thick, you can add a little more OJ or Cool Whip, but it should still be pretty thick so the fruit sticks.

To assemble them...
Spread a little of the cream cycle sauce on each cookie. If you want to... you can even add a little...

NUTELLA SUPRISE!

After you have the sauce on each cookie, add some of each fruit to each one, pressing lightly so the fruit stays on. 

Then take a bunch of pictures of them

And then eat them. Maybe share them with your friends.

*Word to the wise- these should be covered and refrigerated to keep the fruit from going bad and the sauce from separating. It also keeps the cookies from going soggy.

4.07.2013

Broccoli Alfredo "Surprise Dough" Bake

{Is anyone else deathly afraid of "surprise dough"?}
In case you are asking yourself, what in the world is 'surprise dough'? I will tell you. It's the popular doughy delights that come in a can that you find in the chilled section of your grocery store. Such items include cinnamon rolls, pigs in a blanket dough, croissants and biscuits. Most common brand is Pillsbury. The tubular cans that these delicious breads come in, tend to pop open at any given moment, much like a jack-in-the-box toy. It's like playing with fire once you start opening those bad boys... *Shudder*

I hate opening them. In fact, I usually make someone else do it, while I hide around the corner with my hands over my ears. And I always jump. EVERY. TIME. I know it's pathetic, but we all have our quirks.

Anyways, this recipe will require you to not only purchase surprise dough biscuits  but also open them. You've been warned. Trust me, the outcome is worth all the turmoil.


Ingredients:
1 Tbsp salted butter
1/2 medium onion, diced
1 (16 oz) jar of your favorite Alfredo Sauce (or you can make your own)
1/4 cup milk
2 cups chopped chicken (optional)
2 cups broccoli, cut into small pieces
1/4 tsp dried basil
1 can refrigerated biscuits aka Surprise Dough Biscuits
1 Tbsp melted butter
Parmesan cheese for garnish

Directions:
Preheat oven to 350F.
Spray an 8x8 inch baking dish with cooking spray and set aside. In a large nonstick skillet, melt 1 tablespoon butter over medium heat. Add onions and cook until tender. Stir in Alfredo sauce, milk, chicken, broccoli and basil. Cook until thoroughly heated heated and bubbly, stirring occasionally. Pour mixture into prepared baking dish.
Separate biscuits and cut each one in half, crosswise. Arrange around the edge of the baking dish, overlapping slightly. Drizzle with melted butter and sprinkle with Parmesan cheese.
Bake for 15-20 minutes until biscuits are golden brown. Make sure they are cooked all the way through!

Enjoy!!

Source: High Heels and Grills via Pinterest

4.06.2013

Snicker Doodle Apple Cobbler

{Today's post is delicious. That is all}
I'm going to be brutally honest and tell you that I found this on Pinterest. I sort of thought this might be one of those recipes you see on there that is just completely over the top and should not be consumed by anyone. But I looked at the ingredients and thought maybe I had judged it a little too harshly, too quickly. And after making it, I can tell you that it's soooo good. It wasn't overly sweet like a lot of desserts tend to be, and it wasn't as simple and bland as a classic apple pie. I mean, apple pie is good, but sometimes you just need a little variation. Might I suggest this next time you are looking for something simple and unique...


Cookie Ingredients:
1/2 tsp cream of tartar
1/8 tsp salt
1/2 tsp baking powder
2/3 cup flour
1/4 cup butter, softened
1/3 cup sugar plus 1/2 cup
1 egg
3/4 tsp cinnamon

Apple Ingredients:
8 cups (roughly 6-8 apples) (I suggest granny smith)
1/4 cup brown sugar
1/2 tsp cinnamon

Directions:
Preheat oven to 350F.

In a small bowl combine first four dry ingredients for the cookie dough. In a separate bowl or stand mixer, cream butter and 1/3 cup of sugar. Add egg followed by premixed dry ingredients. Mix until dry ingredients are blended into the dough well. Set aside.

In another small bowl combine 3/4 teaspoon and 1/2 cup sugar, set aside. In a larger bowl add 1/4 cup brown sugar and 1/2 teaspoon cinnamon. Peel (I didn't), core and slice apples. Add to brown sugar and cinnamon mixture, tossing to coat. Transfer apples to an 8x8 inch baking dish.


Form 1 inch balls of dough and roll in cinnamon-sugar mixture. Place coated dough balls on top of apples, press down lightly to slightly flatten. Bake for 45-55 minutes or until apples are tender and cookie topping is lightly golden.

Let cool prior to serving!

Source: Baked by Rachel via Pinterest

2.13.2013

Left Over Brisket Buns

{There's a story for how this meal came to be}
A couple weeks ago, we were visiting Banff National Park in Alberta, we had some extra daylight left over after seeing and doing everything we wanted and didn't feel like driving back home. So instead, we drove up the road some more and all of a sudden we crossed the border into British Columbia. We finally stopped in this little town called Golden. We were hungry, so we found this random BBQ restaurant on the side of the highway. Of course, before entering the place, we googled it to see if it was a good place to stop or if a simple Tim Horton's would suffice us until we got home. Turns out, it was a pretty highly rated little shack. So we went it and ordered. I, being the light weight had mac and cheese (cuz I wasn't that hungry) and husband ordered the Brisket Bun. It was the most delicious thing I had tasted... yes, I tasted it. Husband couldn't stop raving about it. So, a couple nights ago I made a brisket. Truth be told, it was just a pot roast because they were fresh out of briskets. I found this recipe on Pinterest called Dr. Pepper Brisket... You had me at Dr. Pep... So I made it, just instead of a brisket we had pot roast. It was DELISH! We had a ton of left overs, so my genius little brain of mine came up with the idea to re-create that brisket bun from Golden, BC. And there you have it. The birth story of one our new favorite dinners!
Ingredients for the brisket/pot roast:
1 medium sized brisket or pot roast
2 cans Dr. Pepper

Place brisket in crock pot, pour Dr. Pepper over the meat and cook on low for 9 hours. Shred. Empty 80% of the Dr. Pepper broth from crock pot, and return meat to broth to moisten.
This can be made in advance.

Ingredients for the sandwich:
Kaiser Buns
Left over brisket/pot roast
Sauteed bell pepper
caramelized onions
Mozzarella
Salt and pepper to taste

Directions:
Start with the onions. Thinly slice them to however you want. There isn't a wrong way to do this, just make sure you are consistent. In a large frying pan add 2 tablespoons EVOO (thank you Rachel Ray) and a tablespoon of butter. Once pan is hot, add your onions. Caramelizing onions is not all that difficult as I found out. In fact, it's pretty simple. You just let them simmer on medium-low heat until a caramely (yes, that's a word now) brown and they are tender and delicious. Stir every so often to make sure they aren't sticking to the pan. If they are, just add a little more butter. They will shrink down in size significantly. For the two of us, we used an onion and a half.


While the onions are caramelizing, slice your pepper into small strips, and saute in a small amount of oil. Medium heat, but you can reduce it towards the end of their cooking process as they will probably beat the onions.

Finished product:

Once the onions and the peppers are finished. Slice your mozza. Slice your bun, and place how ever much meat you can handle on one half of the bun. Place on oven rack and broil until the meat is hot, but not burned. Next, place cheese on the other half of the bun, and broil just until the cheese is melted. But watch it, because it can burn fast! Top meat with onions and peppers, then top with the top of the bun.


I tell ya... it's so good! Best way to make left overs not so bland!

Source: Pinterest (pot roast)

2.12.2013

Cafe Rio Chicken & An Update, Sorta...

Well, well, well... look who finally decided to resurrect herself. Me! I'm happy to report that this behavior is no longer accepted. I was also very happy to see that I had 5 new comments when I logged in! I love all the support!
The good news is that I have A LOT of recipes to catch up on. I've taken thousands of pictures just waiting for a little blog love.
I also got a new camera and have been playing around with it. So my pictures should [hopefully] improve. Look at me, all grow'd up!

On to one of my all time favorite recipes from one of my favorite restaurants! Alberta got it's first official restaurant from the oh, so popular Mexican delicacy they call Costa Vida; it's in Airdrie. And I've been there twice already, over an hours worth of a drive! I'm pathetic! But I've also made my own renditions of their recipes to enjoy in the comfort of my own home without the road trip. You've seen some of my earlier posts on them. So here is a delicious recipe my cousin gave me for Cafe Rio Chicken crock pot style! YUM.


Ingredients:
5 boneless, skinless chicken breasts, thawed
1 bottle of Zesty Italian Dressing
1 pack of ranch dressing mix
1 cup of water
1 teaspoon cumin
1 teaspoon chili powder
salt and pepper to taste (optional)

Directions:
In crock pot, add Italian Dressing, pack of ranch dressing mix, water, cumin, and chili power. Whisk until combined. Add chicken breasts. Cook on high for 4-5 hours or low 7-8 hours. Remove chicken breasts and shred with two forks. Should be so tender you barely have to do much shredding. Serve on tacos, burritos salads or come up with your own recipes! Saves well and easily feeds a family of 4! Enjoy!

Source: Cousin Adrian

5.26.2012

Panera Bread Broccoli Cheese Soup

{it's okay to copy a copy cat recipe}
Disregard any and all thoughts you might have about how unorthodox it might be to eat soup during warm months, because this soup will change your mind about all of those theories. Yeah, it's that good! This is one you will want to add to your menu asap. So, now... go get some broccoli and some cheddar!
Ingredients:
6 tablespoons butter
1 small onion, chopped 
1/4 cup all-purpose flour 
2 cups half-and-half 

2 cups milk (the original recipe called for 2 cups half-and-half, but I didn't have enough so I improvised and it was just as good)
4 cups chicken broth  
1/4 teaspoon nutmeg 
Salt and pepper 
3 heads of broccoli, finely chopped
1 large carrot, diced 
2 1/2 cups (about 8 ounces) grated sharp cheddar cheese (or as much as you want!)


Directions:

Melt the butter in a large spaghetti pot over medium heat. Add the onion and cook until tender, about 5 minutes. Whisk in the flour and cook until golden, 3 to 4 minutes, then gradually whisk in the half-and-half until smooth. Be sure to really gradually add the half-and-half and make sure it's smooth before adding more, this really get the creamy consistency going.
Add the chicken broth and nutmeg, then season with salt and pepper and bring to a simmer. Reduce the heat to medium-low and cook, uncovered, for about 20 minutes.
Add the broccoli and carrot to the broth mixture and simmer until tender, about another 20 minutes. You can puree the soup if you so choose, however I hear this can be quite difficult to do, so I skipped this step. 
Add the cheese to the soup and whisk over medium heat until melted. 


Top with a little extra cheese (mozzarella is also a good choice, too) and serve it up! Maybe a little bread on the side? I think yes!


Source: Yammie's Noshery

Loaded Potato Slices

{bar food extraordinaire}
Not going to lie, I saw these on Pinterest. And can I just say how delicious they are? I was surprised at how easy they were. Perfect for a week night when all you want is fast, quick comfort food. Just like the food you get at bars, but half the price and half the calories, and all in the comfort of your own kitchen.
Ingredients:
3 Russet Potatoes, washed and sliced
1 1/2 cups cheddar cheese, grated
4-5 slices of bacon, cubed and cooked through (can substitute bacon bits)
3-4 green onions, sliced
Olive Oil
Sour cream
Barbecue sauce, optional
Salt and pepper

Directions:
Preheat oven to 350F, spray cookie sheet with Pam or spray butter which ever you prefer. Lay potato slices on cookie sheet as close together as possible so you can fit more on the sheet. Drizzle with a little olive oil. Sprinkle with salt and pepper. Bake for 30 minutes, flipping half way through baking.


Once potatoes are soft and sizzling, sprinkle with cheese, then bacon and green onions. Potatoes should be hot enough to melt the cheese, but just to speed things up you can place them back in the oven for a minute or two.


Mix a little BBQ sauce with sour cream for dipping if you so choose, and there ya go! Enjoy!

2.20.2012

Grandma's Mac & Cheese

{this is what i ate all throughout my childhood}

I crave this dinner! I almost can't stand the boxed mac and cheese when comparing it to this divine pasta. It makes me drool just thinking about it. The cool thing is that you can alter this to make different variations. For example, you can add taco meat and salsa and turn it into a Tex-Mex mac and cheese, or you can use any variety of cheeses you wish. It really is quiet versatile. Enjoy!
Ingredients:
2 cups dried pasta (I used Penne, but elbow macaroni or any other pasta is fine)
2 tablespoons all purpose flour
dash of pepper
2 1/2 cups milk
1 teaspoon Worcestershire sauce
1/4 teaspoon onion powder
1 1/2 cups shredded cheddar cheese 
1 1/2 cups shredded American cheese (you can substitute any melting cheese ie. provolone, mozzarella, or fontina) 

Directions:
Cook pasta according to package directions.

In a large sauce pan, combine milk and flour, whisk together. Turn heat to medium. We are going to make what is called a roux. Don't let it frighten you. (I'm a poet and I didn't even know it.) Stir the sauce frequently, you don't want it to gob up on the bottom of the pan. It will thicken as it heats, be sure to keep as many lumps out as possible (stir, stir, stir). Once it reaches the consistently of a simmering thinned pudding, you can start adding your cheeses, and reduce the heat slightly. Stir as your cheeses melt, again stirring so much that it doesn't burn on the bottom. Add your seasonings, and stir until combined and fragrant. You can add more cheese if you like it really cheesy, like me!

Once your pasta is cooked and drained, pour cheese sauce over pasta. Top with additional cheese if desired.


And you're done!

Cowboy Caviar

{this possibly could be my favorite food}

By popular demand, here it finally is! I have to give credit to my MIL for making this and having me eat it, because now I can't stop eating it. It's like salsa, but not. It's rather indescribable. I know the word "caviar" probably frightens you, but I promise THERE IS NO CAVIAR in this dish, what-so-ever! The next time you have a little get-together, might I suggest serving this... Just trust me.
I know this isn't the greatest picture, but you get the idea.

Ingredients:
1 can black beans
1 can black eyed beans (or any small bean you fancy)
1 can whole kernel corn
1 small red onion, finely chopped (you can use as much or little as you'd like)
1 half bunch of cilantro
1 avocado (optional) cut up into small pieces
2 tablespoons lime juice (or more as per your tastes)
1/2 bottle of Italian Dressing (or more as per your tastes)
1 to 2 tomatoes, seeded and finely chopped
Salt and pepper to taste

Directions:
Mix all the ingredients together in a large bowl, make sure to taste it as you go. If you'd like more dressing or lime juice, then go for it. I personally am a lover of cilantro... so we usually add a lot.

Served best with hint of lime tortilla chips. (Note to self: get a manicure.)

Chili and Corn Bread Waffles

{waffle iron required}

Thank you Pinterest for this awesome idea! Why I didn't think of it first, is beyond me. I was a bit skeptical at first, because I was nervous this wouldn't work for me. Sometimes things in my kitchen just decide they aren't going to cooperate like normal working kitchen things. 
Anyways, this was a fantastic meal for a quick dinner. Whether you slave all day making this delicious chili or using the regular stuff from the store, this will be a hit! Perfect for a week night!

Ingredients:
1 cup corn meal
3/4 cup all purpose flour
2 to 4 tablespoons sugar
2 1/2 teaspoons baking powder
1/2 teaspoon salt
1 cup milk
2 eggs
1/4 cup butter, melted.


Directions:
Hopefully you have your chili already prepared. Piping hot and ready to go. Preheat your waffle iron. In a medium bowl stir together cornmeal, flour, sugar, baking powder and salt. Set aside. 

In another bowl, whisk together milk, eggs and butter. Add milk mixture all at once to cornmeal mixture. Stir just until moistened. 


Spray your waffle iron with Pam or something of the like, and pour a small amount of batter onto waffle iron. Close and follow the same steps you would follow for making waffles, as per your waffle iron directions. Repeat until the batter is all used up.


Once all your corn bread waffles are done, pour some chili over top of each one, and sprinkle with cheese if that's your thing. Now, eat!


Source: Pinterest

Grandma Lee's Pumpkin Pie

{as traditional as traditional gets}

I look to my mother and her mother for almost all of all my cooking and baking examples. I credit them for just about everything. I really do cherish my memories of eating their food, and remember how they used to let me help when I was too young to understand what I was doing. This pie, as simple and traditional as it is, reminds me of Thanksgiving at my grandma's. I know this post a tad late for the season, considering it's almost spring- but I'm sure you'll forgive me.
Ingredients for the filling:
1 (15 oz) can pure pumpkin puree
1 can sweetened condenced milk
1 egg
3/4 cup brown sugar
1 1/4 teaspoons ground cinnamon
1 teaspoon ground ginger
1/4 teaspoon ground cloves
dash of ground nutmeg

Ingredients for the crust: (makes 2 pie crusts)
2 cups flour
1 teaspoon salt
2/3 cup + 2 tablespoons shortening
4-5 tablespoons water

Directions:
For the crust: Preheat oven to 375F. In a large bowl combine flour and salt. Cut in shortening. Add water 1 tablespoon at a time, mixing to make stiff dough. Divide dough in half, roll out to about 1/8 of an inch thick or large enough to fit an 8 inch pie pan. The rest of the dough can be used to decorate how ever you like, or you can freeze it. Here are some great ideas for decorating.

For the filling: In another large bowl, add all the filling ingredients, and mix until completely combined. Pour into pie shell, and take a picture.


Bake for about 50-60 minutes, or until a toothpick inserted in the center comes out clean. Cool to serve.
Cut into a big, fat slice and top with way too much whipped cream...
And you're done!

12.11.2011

Soft Gingerbread Cookies

{the essence of Christmas foods}
Sometimes when the outside world, looks like this:
  This is for real... probably shouldn't be taking pictures and driving at the same time in 6 inches of snow, but whatever... I lived.

... the first thing that comes to my mind is Christmas. And with Christmas, comes baking. Specifically gingerbread cookies. This was my first time making them from scratch. I was pretty impressed- me and cookies usually don't get along very well, but these were easy and relatively fool proof. Me likey! They were absolutely delish and super soft. My husby took them to work, and everyone requested more. I'll allow it!
Ingredients:
1/2 cup shortening
1/2 cup white sugar
1 teaspoon baking powder
1 teaspoon ground ginger
1/2 teaspoon baking soda
1/2 teaspoon ground cinnamon
1/2 teaspoon ground cloves
1/2 cup molasses
1 egg
1 tablespoon vinegar
2 1/2 cups flour

Directions: 
In a large mixing bowl beat shortening with an electric mixer on medium to high speed for 30 seconds. Add sugar, baking powder, ginger, baking soda, cinnamon, and cloves. Beat until combined, scraping the sides of the bowl occasionally. 
Beat in molasses, egg and vinegar [enter elementary school memories of your science fair volcano explosion here] [get it... baking soda and vinegar...] beat until combined and note the the bubbly-ness that occurs. Beat in as much of the flour as you can, and stir in the remainder until combined.
Cover and chill dough in the fridge for 3 hours or until firm and easy to handle.
Preheat oven to 375F. Grease a cookie sheet, set aside.  
On a lightly floured surface, roll half of the dough at a time to 1/8 inch thick. Using cookie cutters, cut into shapes and place on cookie sheet.

Bake for 5-6 minutes or until bottoms are light brown. Cool on cookie sheet, then transfer to wire wrack. 
Here's the best part... DECORATING! Use basic powdered sugar icing to pipe and color (if desired) to decorate however you want! Go nuts!
A little Red Sox pride here... I couldn't help it!
Happy Holiday Baking!
  

The World's Best Dinner Rolls

{nuff said}
I've been meaning to try these for the longest time, but the phrase 'making bread' has the up most negative connotation I can think of. Bread is yummy, yet labor intensive. Anyways, these truly do live up to their name. I've never tasted heaven before... until these babies came into my life. 
These were a part of our Thanksgiving dinner, maybe if you are looking for something to complete your Christmas dinner, yes?... But you don't really need a reason to make them, let's just be honest!


Ingredients:
2 cup whole milk (if you’re in a pinch, you can use 2%, but whole is best. Don’t use 1% or skim)
½ cup + 1 Tbsp. sugar, divided
1/3 c. (5 1/3 Tbsp.) butter
2 tsp. Kosher salt
2 pkgs. active dry yeast (or 4 1/2 tsp.)
2/3 cup warm (105-115-degree) water
8-9 cups all-purpose flour
3 beaten eggs

Directions:

Combine milk, 1/2 cup sugar, butter, and salt in a medium saucepan. Heat over medium heat until butter melts.
Remove from heat. Allow to cool to lukewarm. I filled my sink full of ice cubs and set the pan in the sink. This step is really important because if the mixture is too hot, it will kill the yeast.
While the milk mixture is cooling, dissolve the yeast and 1 Tbsp. sugar in warm water. Let stand about 10 minutes. If the yeast hasn’t bubbled, you’ll need to repeat this step.
In a large mixing bowl, combine 3 cups flour and milk mixture. Beat on low for 30 seconds, scraping sides of bowl constantly. Add yeast mixture and beat on high for 3 minutes.

Add beaten eggs. Beat again until combined. Stir in as much remaining flour as needed to make a soft dough. This dough should be very soft–it will be coming away from the sides of the bowl, but it will still stick to your finger when you touch it. Don’t worry, it will firm up during the rising process. Part of what makes these rolls so good is that they’re so soft and light; if you add too much flour, they will be heavy and dense. Place the bowl in a warm place and cover with a clean towel; allow to rise 1 hour.

Punch down dough. Lightly flour your work surface and turn dough out onto surface. Divide in half.
Spray 2 9×13 glass pans with cooking spray. Roll first portion of dough into a rectangle and then cut it into 12 equal-sized pieces. This dough should be very easy to work with, almost like play-dough. Shape each piece into a ball and place in prepared pan. Repeat with remaining dough in the second pan.

Cover with a clean cloth and allow to rise in a warm place for about 30 minutes. When dough has about 15-20 minutes to go (depending on your oven), preheat oven to 375.

Bake for 15-18 minutes or until golden-brown.

Remove from the oven and allow to cool to room temperature. These are absolutely fantastic... ask my FIL. He ate them all!


Source: Our Best Bites - World's Best Dinner Rolls
 

12.02.2011

Winner Winner Chicken Dinner!

thanks everyone who entered to win  my first ever giveaway! I'm so excited, I almost can't contain myself!

the winner of the Scentsy Plug-In warmer is....

Allison Checketts!

Allison, let me know which warmer and scent you'd like! 
And Congrats!

Thanks everyone again! I hope to have more giveaways in the near future so keep sending me all the blog love! 

Last Chance!

Today is the last day to enter to win a free Scentsy Plug-In Warmer and free scent!

Leave me a comment and become a follower is all you have to do to enter!

Winner will be announced tonight at 9pm!

11.30.2011

Very First!

{blog giveaway!}

You heard right, folks! Since it's Christmas (almost... December 1 counts...) and since I'm a really nice person... 
 I've decided to do a giveaway for a Plug-In Scentsy Warmer!

The giveaway starts now, and will end on Friday, December 2 at 9pm (my time) (so mountain time... duh). At which time, the winner will be announced.
You will have your choice as to which Plug-In warmer you'd like, here are a few of my favorites...
 Taro
 Boho Chic (currently behind my Christmas Tree... with Festival of Tree's burning...)
 Pop!
Groovy Green

You can check out the rest of the Plug-In's and all the other great Scentsy products by visiting my personal Scentsy website: http://kelseyfairbanks.scentsy.ca.

 Now, for the RULES:
  1. Like my Facebook Page and become a follower on my blog. 
2. Leave me a comment either on this post AND/OR Facebook letting me know you're a follower- It's that simple, kiddos.
  
Once again, the winner will be announced on Friday at 9pm. 

Good luck!

Ready...... GO!


11.09.2011

Margharita Pizza

{pizza pizza}
I've always been so curious about margharita pizza, since it's obviously not made out of the alcoholic drink, it baffled my mind for the longest time. I also have to admit, I've never had fresh mozzarella before until I made this pizza. It was like heaven! I love cheese, but this was cheese x5! The combination of mozzarella, basil, and tomato sauce is genius. Pepperoni and pineapple has a run for it's money. Anyways, the recipe is farly simple. But lets always remember the rule with pizza... you can make it however you want. This is a great idea if you are wanting to switch things up for dinner tonight!
Ingredients:
Fresh mozzarella
Fresh basil leaves, whole
Your favorite pizza sauce
Pizza dough (you can make your own, or use store bought)
Italian seasoning

Directions:
Preheat your oven to the dough's specifications. Like all pizza, roll your dough out to desired thickness and size, and place on baking sheet or pizza brick. Spread with a thin layer of sauce... then add some more sauce, and spread it around. Slice up your fresh mozzarella, as thin as possible, but thick wont hurt either I suppose. Place cheese slices around on top of the pizza. If you like your pizza super cheesy you can place them closer together. Next, lay basil leaves on top of cheese, again you can use as much or as little as you'd like. Sprinkle with Italian seasoning.

Bake for time specified with your dough, and enjoy! 

11.06.2011

Good Mood Tostadas

{comfort food in a taco shell}
I don't even know what the heck tostadas even are, but they look like open faced tacos to me. And I love tacos. So immediately, of course, I loved these! They were pretty easy to assemble, and oh so delicious for a week night. I highly recommend them to anyone. They did actually make me feel better after a long hard day at work!
Ingredients:
1 tablespoon vegetable, plus more for frying
1 pound ground beef
One package taco seasoning (plus water for the seasoning)
Pinch of Salt
1 can re-fried beans
6 small tortillas (corn or flour)
1 recipe Yes, I Make My Own Salsa

All the fixings you like:
Lettuce
Shredded cheddar cheese
Guac
Sour cream

Directions:
In a medium skillet, heat 1 tablespoon oil over moderately high heat. Add the beef and cook, stirring to break up any lumps, until browned, about 6 minutes. Add salt and pepper to taste.

Spoon off any excess oil from the skillet. Stir in the taco seasoning and water and cook for 1 minute. Scrape the meat into a heatproof bowl, cover and set aside.

Assemble all your condiments so they are ready to go. Heat 1/2 inch of vegetable oil in the skillet over moderately high heat. Test the temperature of the oil: when a drop of water sizzles on the surface, using tongs, place 1 tortilla in the oil. Fry, turning once, until golden grown, about 1 minute. A flour tortilla may bubble a bit, but it will flatten out after frying. Transfer to a paper towel-lined plate.
To serve, spread each tortilla with re-fried beans, then top with a few tablespoons of ground beef and desired condiments. Ta-da!

Source:
100 Recipes Every Woman Should Know

Streusel topped, Cream Cheese filled Pumpkin Muffins

{oh yes, i went there}
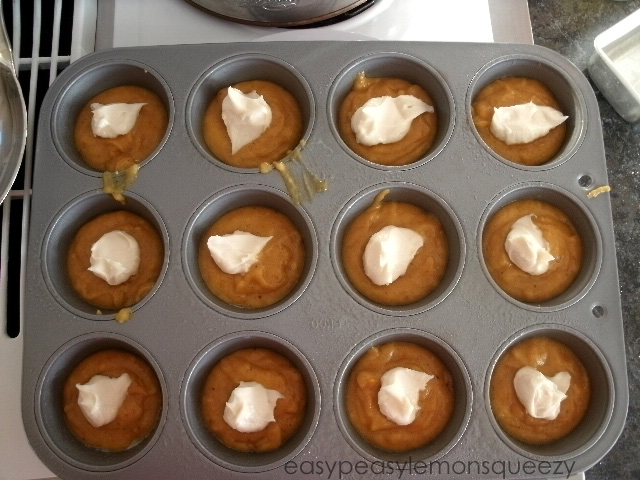
Truth be told, these pictures were taken a while ago... I'm just THAT lame. Nonetheless, they are still amazing and you should just stop looking for another pumpkin bread recipe right now. This is, hands down, the best recipe I've ever put into my mouth. Ever. Pumpkin bread is my #1 favorite food, and I've tried many different recipes. This one is my absolute favorite! You can use this recipe for pumpkin bread with small or large loaf pans (50 minutes baking for large loafs) or cupcakes/muffins... you could probably even use a bundt pan. It's pretty versatile!
Ingredients:
1 15oz can pumpkin puree
4 eggs
1 cup vegetable oil
2/3 cup water
3 cup white sugar
3 1/2 cups all purpose flour
2 teaspoons baking soda
1 1/2 teaspoons salt
1 teaspoon cinnamon
1 teaspoon nutmeg
1/2 teaspoon ground cloves
1/2 teaspoon ground ginger

Cream Cheese Filling:
4 oz cream cheese, softened
1/2 cup powdered sugar
1 1/2 teaspoon vanilla


Streusel:
1/2 cup all-purpose flour
1/3 cup granulated sugar
1/4cup pecans, roughly chopped
1/2 teaspoon ground cinnamon
3 tablespoons unsalted butter, melted


Directions:
Make the cream cheese filling: For the Cream Cheese Filling: In a medium bowl, stir together the cream cheese and confectioners’ sugar until smooth. Add the vanilla, and stir to combine. Form the mixture into a 12-inch log on a piece of plastic wrap, wrap it, and freeze it for at least two hours.

Make the Pecan Streusel: In a medium bowl, use a fork to combine the flour, sugar, pecans, butter, and cinnamon. Set aside.
Preheat oven to 350F, and line muffin pan with muffin tins. In a large bowl, mix together pumpkin puree, eggs, oil, water and sugar until well blended. In a separate bowl, whisk together the flour, baking soda, salt, cinnamon, nutmeg, cloves and ginger. Stir the dry ingredients into the pumpkin mixture until just blended. 

Remove cream cheese from freezer, and cut into 12- 1 inch cubes. Scoop a small amount of pumpkin batter into the prepared muffin tins, placing one cream cheese cube on top. Add a little more batter to cover cream cheese, should be no ore than 2/3 full. 
Sprinkle with streusel, and pop them in the oven for 20-25 minutes, or until golden brown. Let cool in the pan for 10 minutes before turning out onto a cooling rack. Store in an air tight container. 

 So freaking good... and can I just add, these make GREAT gifts to neighbors and friends- perfect for the holidays!


Source:
Downeast Maine Pumpkin Bread - Allrecipes.com
Browned Eyed Baker - Pumpkin and Cream Cheese Muffins with Pecan Streusel


Pin it!