Today is the last day to enter to win a free Scentsy Plug-In Warmer and free scent!
Leave me a comment and become a follower is all you have to do to enter!
Winner will be announced tonight at 9pm!

12.02.2011

11.30.2011
Very First!
{blog giveaway!}


You heard right, folks! Since it's Christmas (almost... December 1 counts...) and since I'm a really nice person...
I've decided to do a giveaway for a Plug-In Scentsy Warmer!
The giveaway starts now, and will end on Friday, December 2 at 9pm (my time) (so mountain time... duh). At which time, the winner will be announced.
You will have your choice as to which Plug-In warmer you'd like, here are a few of my favorites...
Taro
Boho Chic (currently behind my Christmas Tree... with Festival of Tree's burning...)
Pop!
Groovy Green
You can check out the rest of the Plug-In's and all the other great Scentsy products by visiting my personal Scentsy website: http://kelseyfairbanks.scentsy.ca.
Now, for the RULES:
1. Like my Facebook Page and become a follower on my blog.
2. Leave me a comment either on this post AND/OR Facebook letting me know you're a follower- It's that simple, kiddos.
Once again, the winner will be announced on Friday at 9pm.
Good luck!
Ready...... GO!
11.09.2011
Margharita Pizza
{pizza pizza}
I've always been so curious about margharita pizza, since it's obviously not made out of the alcoholic drink, it baffled my mind for the longest time. I also have to admit, I've never had fresh mozzarella before until I made this pizza. It was like heaven! I love cheese, but this was cheese x5! The combination of mozzarella, basil, and tomato sauce is genius. Pepperoni and pineapple has a run for it's money. Anyways, the recipe is farly simple. But lets always remember the rule with pizza... you can make it however you want. This is a great idea if you are wanting to switch things up for dinner tonight!
 Ingredients:
Fresh mozzarella
Fresh basil leaves, whole
Your favorite pizza sauce
Pizza dough (you can make your own, or use store bought)
Italian seasoning
Directions:
Preheat your oven to the dough's specifications. Like all pizza, roll your dough out to desired thickness and size, and place on baking sheet or pizza brick. Spread with a thin layer of sauce... then add some more sauce, and spread it around. Slice up your fresh mozzarella, as thin as possible, but thick wont hurt either I suppose. Place cheese slices around on top of the pizza. If you like your pizza super cheesy you can place them closer together. Next, lay basil leaves on top of cheese, again you can use as much or as little as you'd like. Sprinkle with Italian seasoning.
 Bake for time specified with your dough, and enjoy!
I've always been so curious about margharita pizza, since it's obviously not made out of the alcoholic drink, it baffled my mind for the longest time. I also have to admit, I've never had fresh mozzarella before until I made this pizza. It was like heaven! I love cheese, but this was cheese x5! The combination of mozzarella, basil, and tomato sauce is genius. Pepperoni and pineapple has a run for it's money. Anyways, the recipe is farly simple. But lets always remember the rule with pizza... you can make it however you want. This is a great idea if you are wanting to switch things up for dinner tonight!

Fresh mozzarella
Fresh basil leaves, whole
Your favorite pizza sauce
Pizza dough (you can make your own, or use store bought)
Italian seasoning
Directions:
Preheat your oven to the dough's specifications. Like all pizza, roll your dough out to desired thickness and size, and place on baking sheet or pizza brick. Spread with a thin layer of sauce... then add some more sauce, and spread it around. Slice up your fresh mozzarella, as thin as possible, but thick wont hurt either I suppose. Place cheese slices around on top of the pizza. If you like your pizza super cheesy you can place them closer together. Next, lay basil leaves on top of cheese, again you can use as much or as little as you'd like. Sprinkle with Italian seasoning.

11.06.2011
Good Mood Tostadas
{comfort food in a taco shell}
I don't even know what the heck tostadas even are, but they look like open faced tacos to me. And I love tacos. So immediately, of course, I loved these! They were pretty easy to assemble, and oh so delicious for a week night. I highly recommend them to anyone. They did actually make me feel better after a long hard day at work!
 Ingredients:
1 tablespoon vegetable, plus more for frying
1 pound ground beef
One package taco seasoning (plus water for the seasoning)
Pinch of Salt
1 can re-fried beans
6 small tortillas (corn or flour)
1 recipe Yes, I Make My Own Salsa
All the fixings you like:
Lettuce
Shredded cheddar cheese
Guac
Sour cream
Directions:
In a medium skillet, heat 1 tablespoon oil over moderately high heat. Add the beef and cook, stirring to break up any lumps, until browned, about 6 minutes. Add salt and pepper to taste.
Spoon off any excess oil from the skillet. Stir in the taco seasoning and water and cook for 1 minute. Scrape the meat into a heatproof bowl, cover and set aside.
Assemble all your condiments so they are ready to go. Heat 1/2 inch of vegetable oil in the skillet over moderately high heat. Test the temperature of the oil: when a drop of water sizzles on the surface, using tongs, place 1 tortilla in the oil. Fry, turning once, until golden grown, about 1 minute. A flour tortilla may bubble a bit, but it will flatten out after frying. Transfer to a paper towel-lined plate.
 To serve, spread each tortilla with re-fried beans, then top with a few tablespoons of ground beef and desired condiments. Ta-da!
Source:
100 Recipes Every Woman Should Know
I don't even know what the heck tostadas even are, but they look like open faced tacos to me. And I love tacos. So immediately, of course, I loved these! They were pretty easy to assemble, and oh so delicious for a week night. I highly recommend them to anyone. They did actually make me feel better after a long hard day at work!

1 tablespoon vegetable, plus more for frying
1 pound ground beef
One package taco seasoning (plus water for the seasoning)
Pinch of Salt
1 can re-fried beans
6 small tortillas (corn or flour)
1 recipe Yes, I Make My Own Salsa
All the fixings you like:
Lettuce
Shredded cheddar cheese
Guac
Sour cream
Directions:
In a medium skillet, heat 1 tablespoon oil over moderately high heat. Add the beef and cook, stirring to break up any lumps, until browned, about 6 minutes. Add salt and pepper to taste.
Spoon off any excess oil from the skillet. Stir in the taco seasoning and water and cook for 1 minute. Scrape the meat into a heatproof bowl, cover and set aside.
Assemble all your condiments so they are ready to go. Heat 1/2 inch of vegetable oil in the skillet over moderately high heat. Test the temperature of the oil: when a drop of water sizzles on the surface, using tongs, place 1 tortilla in the oil. Fry, turning once, until golden grown, about 1 minute. A flour tortilla may bubble a bit, but it will flatten out after frying. Transfer to a paper towel-lined plate.

Source:
100 Recipes Every Woman Should Know
Streusel topped, Cream Cheese filled Pumpkin Muffins
{oh yes, i went there}
Truth be told, these pictures were taken a while ago... I'm just THAT lame. Nonetheless, they are still amazing and you should just stop looking for another pumpkin bread recipe right now. This is, hands down, the best recipe I've ever put into my mouth. Ever. Pumpkin bread is my #1 favorite food, and I've tried many different recipes. This one is my absolute favorite! You can use this recipe for pumpkin bread with small or large loaf pans (50 minutes baking for large loafs) or cupcakes/muffins... you could probably even use a bundt pan. It's pretty versatile!
 Ingredients:
1 15oz can pumpkin puree
4 eggs
1 cup vegetable oil
2/3 cup water
3 cup white sugar
3 1/2 cups all purpose flour
2 teaspoons baking soda
1 1/2 teaspoons salt
1 teaspoon cinnamon
1 teaspoon nutmeg
1/2 teaspoon ground cloves
1/2 teaspoon ground ginger
Cream Cheese Filling:
4 oz cream cheese, softened
1/2 cup powdered sugar
1 1/2 teaspoon vanilla
Streusel:
1/2 cup all-purpose flour
1/3 cup granulated sugar
1/4cup pecans, roughly chopped
1/2 teaspoon ground cinnamon
3 tablespoons unsalted butter, melted
Directions:
Make the cream cheese filling: For the Cream Cheese Filling: In a medium bowl, stir together the cream cheese and confectioners’ sugar until smooth. Add the vanilla, and stir to combine. Form the mixture into a 12-inch log on a piece of plastic wrap, wrap it, and freeze it for at least two hours.
Make the Pecan Streusel: In a medium bowl, use a fork to combine the flour, sugar, pecans, butter, and cinnamon. Set aside.
 Preheat oven to 350F, and line muffin pan with muffin tins. In a large bowl, mix together pumpkin puree, eggs, oil, water and sugar until well blended. In a separate bowl, whisk together the flour, baking soda, salt, cinnamon, nutmeg, cloves and ginger. Stir the dry ingredients into the pumpkin mixture until just blended.
Remove cream cheese from freezer, and cut into 12- 1 inch cubes. Scoop a small amount of pumpkin batter into the prepared muffin tins, placing one cream cheese cube on top. Add a little more batter to cover cream cheese, should be no ore than 2/3 full.
 Sprinkle with streusel, and pop them in the oven for 20-25 minutes, or until golden brown. Let cool in the pan for 10 minutes before turning out onto a cooling rack. Store in an air tight container.

So freaking good... and can I just add, these make GREAT gifts to neighbors and friends- perfect for the holidays!
Source:
Downeast Maine Pumpkin Bread - Allrecipes.com
Browned Eyed Baker - Pumpkin and Cream Cheese Muffins with Pecan Streusel
Truth be told, these pictures were taken a while ago... I'm just THAT lame. Nonetheless, they are still amazing and you should just stop looking for another pumpkin bread recipe right now. This is, hands down, the best recipe I've ever put into my mouth. Ever. Pumpkin bread is my #1 favorite food, and I've tried many different recipes. This one is my absolute favorite! You can use this recipe for pumpkin bread with small or large loaf pans (50 minutes baking for large loafs) or cupcakes/muffins... you could probably even use a bundt pan. It's pretty versatile!

1 15oz can pumpkin puree
4 eggs
1 cup vegetable oil
2/3 cup water
3 cup white sugar
3 1/2 cups all purpose flour
2 teaspoons baking soda
1 1/2 teaspoons salt
1 teaspoon cinnamon
1 teaspoon nutmeg
1/2 teaspoon ground cloves
1/2 teaspoon ground ginger
Cream Cheese Filling:
4 oz cream cheese, softened
1/2 cup powdered sugar
1 1/2 teaspoon vanilla
Streusel:
1/2 cup all-purpose flour
1/3 cup granulated sugar
1/4cup pecans, roughly chopped
1/2 teaspoon ground cinnamon
3 tablespoons unsalted butter, melted
Directions:
Make the cream cheese filling: For the Cream Cheese Filling: In a medium bowl, stir together the cream cheese and confectioners’ sugar until smooth. Add the vanilla, and stir to combine. Form the mixture into a 12-inch log on a piece of plastic wrap, wrap it, and freeze it for at least two hours.
Make the Pecan Streusel: In a medium bowl, use a fork to combine the flour, sugar, pecans, butter, and cinnamon. Set aside.

Remove cream cheese from freezer, and cut into 12- 1 inch cubes. Scoop a small amount of pumpkin batter into the prepared muffin tins, placing one cream cheese cube on top. Add a little more batter to cover cream cheese, should be no ore than 2/3 full.
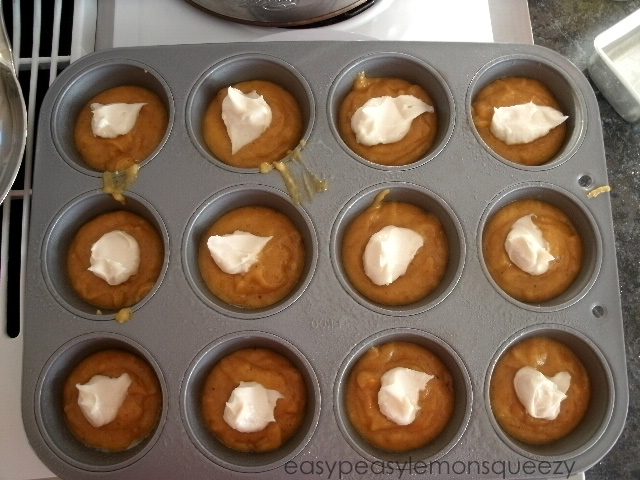

So freaking good... and can I just add, these make GREAT gifts to neighbors and friends- perfect for the holidays!
Source:
Downeast Maine Pumpkin Bread - Allrecipes.com
Browned Eyed Baker - Pumpkin and Cream Cheese Muffins with Pecan Streusel
Yes, I Make My Own Salsa
{Yup}
Not sure if you knew about my new book... "100 Recipes Every Woman Should Know", It's amazing! Everything I've made from it has been easy and has turned out fantastic. Have you heard of Engagement Chicken? I haven't tried it yet- ya know, since I'm not really interested in being proposed to again, but it sounds yummy! Anyways, so I got this salsa recipe from my new cookbook- and was it good? If you're asking if my husband ate it with nothing else but a fork, then yes. I guess that means it was good!

Not sure if you knew about my new book... "100 Recipes Every Woman Should Know", It's amazing! Everything I've made from it has been easy and has turned out fantastic. Have you heard of Engagement Chicken? I haven't tried it yet- ya know, since I'm not really interested in being proposed to again, but it sounds yummy! Anyways, so I got this salsa recipe from my new cookbook- and was it good? If you're asking if my husband ate it with nothing else but a fork, then yes. I guess that means it was good!

this picture was taken with my iphone
Ingredients:
4 large plus tomatoes, halved
1/2 small red onion
1/4 cup chopped fresh cilantro
1/4 jalapeno pepper, minced
Salt and pepper to taste
Fresh lime juice
Directions:
Remove the pulp and seeds from the tomatoes then cut them either into small cubes or large cubes depending on how you like your salsa. Cut the onion up as well, I like mine very small. In a serving bowl, combine the tomatoes and onion with the cilantro and jalapeno. Mix well and add salt and pepper and lime juice to taste.
And that's all folks!
10.30.2011
100th Post Fondant Cake!
{It's pretty much a big deal}
I sat down last week to edit and post all these great recipes I have, but haven't had any spare time to share with anyone... when I saw that the next post was going to be #100. I yelled across the room (cuz that's how it's done these days when I'm on my computer on the couch, and husby is on the other computer across the room with headphones on) and told him it was going to be #100- and he totally flipped out! I was beyond surprised, I was expecting the usual "yeah, okay whatever" that I normally get... but no! He gets up and is all excited, and tells me I can't just do any ol' recipe I have (even though I have about 10 that I haven't blogged about yet), and insists that I do something spectacular.
Well spectacular was a little too advanced for me, haha! Realty hit me, and I decided to do something that I actually KNEW I could accomplish without a meltdown in the kitchen. I have wanted to do a cake with fondant for a long time, but I was so afraid of destruction, that I put it off for a really long time- it only seemed right to try it for such a stupendous occasion such as this.
At first, I wanted to do a two tiered cake... mmm... but then I did some research on how to successfully put a tiered cake together and decided I should aim a little lower since I haven't done anything like this before. I mean, cooking and baking is one thing... but mechanics?! Ahem, um, no. That had the words EPIC FAIL written all over it. So here we have it. A simple 8 inch two layer cake, complete with fondant.


I sat down last week to edit and post all these great recipes I have, but haven't had any spare time to share with anyone... when I saw that the next post was going to be #100. I yelled across the room (cuz that's how it's done these days when I'm on my computer on the couch, and husby is on the other computer across the room with headphones on) and told him it was going to be #100- and he totally flipped out! I was beyond surprised, I was expecting the usual "yeah, okay whatever" that I normally get... but no! He gets up and is all excited, and tells me I can't just do any ol' recipe I have (even though I have about 10 that I haven't blogged about yet), and insists that I do something spectacular.
Well spectacular was a little too advanced for me, haha! Realty hit me, and I decided to do something that I actually KNEW I could accomplish without a meltdown in the kitchen. I have wanted to do a cake with fondant for a long time, but I was so afraid of destruction, that I put it off for a really long time- it only seemed right to try it for such a stupendous occasion such as this.
At first, I wanted to do a two tiered cake... mmm... but then I did some research on how to successfully put a tiered cake together and decided I should aim a little lower since I haven't done anything like this before. I mean, cooking and baking is one thing... but mechanics?! Ahem, um, no. That had the words EPIC FAIL written all over it. So here we have it. A simple 8 inch two layer cake, complete with fondant.


the above picture is taken with my iphone... btw.
So obviously, it's not perfect. I wasn't expecting it to be. After all, it was my first time using fondant, ever. There are a few cracks.. one side I tore a huge hole and the frosting started oozing out all over the place. I tried to patch it up, but you could definitely tell it was there! I'd say though, I did pretty well! It was a tad dry as well, but I know for next time what it should feel like. The decoration is simply just piped on using my favorite chocolate frosting...

Mmm... So good! It was free hand, so yeah... it's definitely not perfect, either. I'm pretty proud of myself though! In case you are wondering, I used a regular box cake (gasp!) because I was more anxious to use the fondant and eat my frosting... plus I think cake mixes from boxes are pretty good, if I do say so myself.
Anyways, happy 100th to Easy Peasy! Thanks for all the comments and blog love! Here's to another 100...
10.19.2011
Hot Dog Mummies
{mummify your dogs}
First off...
I have many reasons for not updating since JUNE. But no one really cares, as long as I'm back, right? That's what I thought.
So I've seen these done a thousand times, but only until my cousin Adrian made me a superb cookbook which included this fun recipe, did I actually try it. I first tried it a two Halloweens ago. I made them with my own recipe for pizza though... It was gross. I don't know what I was thinking. So this year, I decided to go with something I knew I liked- Pillsbury croissants. This recipe would be especially fabulous for kids! And of course, particularly amazing during October. (But let's be real- you can eat them anytime you want.)
 Ingredients:
6 hot dogs (or the like)
1 can of Pillsbury Crescent Rolls
Directions:
Preheat oven to 350F. Very carefully open and unroll the dough, doing your absolute best not to tear the crescent rolls into serrated segments. The dough will have a serrated break horizontally halfway through the dough, go ahead and separate the dough into two equal portions. This sounds more complicated than it actually is. Lay the two dough pieces flat, and cut each portion into 6, 1 inch strips. Wrap two strips around each hot dog, squishing the meeting ends together, leaving a space at one end of the hot dog for the face. If the dough happens to tear along the serrated lines, just squish it back together.
Bake on a non greased baking sheet for about 10-15 minutes or until golden brown and the hot dogs are slightly bubbly. Use mustard for the eyes, and wa-la!
First off...
I have many reasons for not updating since JUNE. But no one really cares, as long as I'm back, right? That's what I thought.
So I've seen these done a thousand times, but only until my cousin Adrian made me a superb cookbook which included this fun recipe, did I actually try it. I first tried it a two Halloweens ago. I made them with my own recipe for pizza though... It was gross. I don't know what I was thinking. So this year, I decided to go with something I knew I liked- Pillsbury croissants. This recipe would be especially fabulous for kids! And of course, particularly amazing during October. (But let's be real- you can eat them anytime you want.)

6 hot dogs (or the like)
1 can of Pillsbury Crescent Rolls
Directions:
Preheat oven to 350F. Very carefully open and unroll the dough, doing your absolute best not to tear the crescent rolls into serrated segments. The dough will have a serrated break horizontally halfway through the dough, go ahead and separate the dough into two equal portions. This sounds more complicated than it actually is. Lay the two dough pieces flat, and cut each portion into 6, 1 inch strips. Wrap two strips around each hot dog, squishing the meeting ends together, leaving a space at one end of the hot dog for the face. If the dough happens to tear along the serrated lines, just squish it back together.
Bake on a non greased baking sheet for about 10-15 minutes or until golden brown and the hot dogs are slightly bubbly. Use mustard for the eyes, and wa-la!
Subscribe to:
Posts (Atom)
Pin it!
